Unlock the Tropical Dream: Mastering Homemade Toasted Coconut Ice Cream
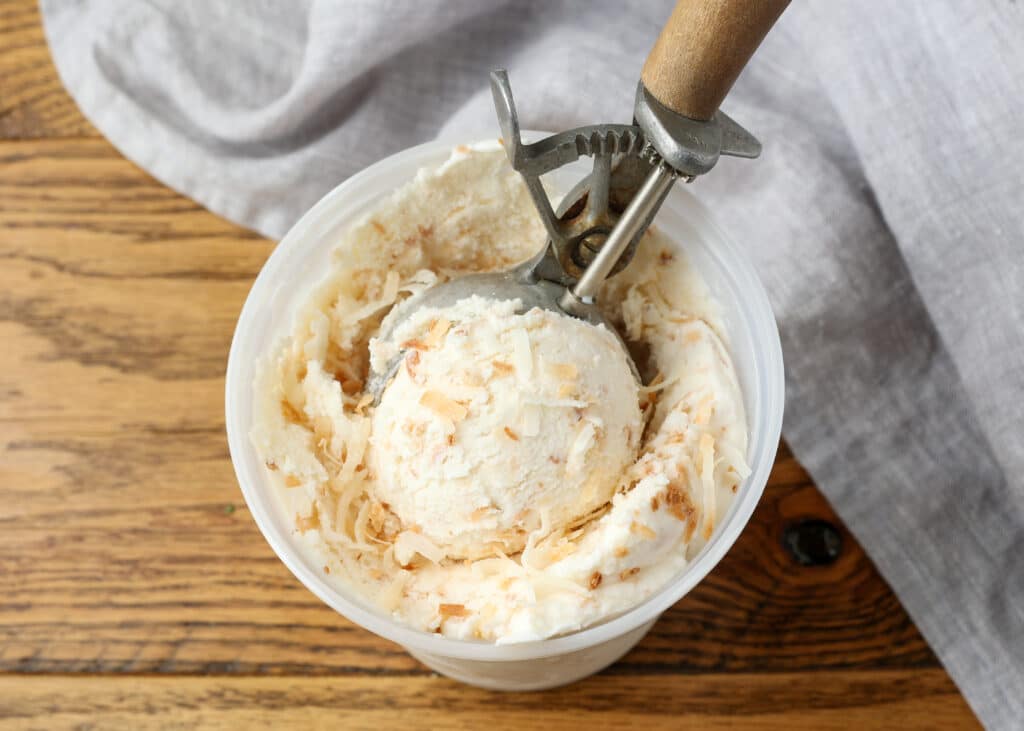
There's something uniquely satisfying about homemade ice cream – the rich creaminess, the vibrant flavors, and the sheer joy of creating a gourmet treat right in your kitchen. While many ice cream flavors compete for attention, few offer the exotic allure and comforting familiarity of **toasted coconut ice cream**. It's more than just a dessert; it's a passport to tropical bliss, a perfect antidote to a warm day, and surprisingly, a fantastic way to impress even the most discerning palates. Forget bland, imitation coconut flavors; we're diving into how to achieve a genuinely deep, aromatic, and perfectly scoopable **toasted coconut ice cream** that will have everyone asking for your secret.
The journey to perfect **homemade toasted coconut ice cream** begins with understanding the nuances of its star ingredient and the common pitfalls home chefs face. From transforming raw coconut into a golden, flavor-packed powerhouse to ensuring your final product isn't a frozen brick, we'll guide you through every step. Prepare to dust off that ice cream maker – summer barbecues, lazy afternoons, or simply a craving for something extraordinary are about to get a whole lot sweeter.
The Secret to Unforgettable Coconut Flavor: Mastering the Toast
The single most crucial step in elevating your **toasted coconut ice cream** from good to absolutely legendary is the toasting process itself. Many commercial coconut ice creams fall flat, delivering a taste that often resembles sunscreen rather than the rich, nutty fruit. This is because raw coconut, while pleasant, lacks the depth and complexity that heat unlocks. Toasting isn't just about color; it's about flavor transformation. The Maillard reaction, a chemical process responsible for the browning and delicious aroma of many cooked foods, works its magic on the coconut, bringing out its inherent sweetness and imparting a deep, irresistible nuttiness that defines authentic **toasted coconut ice cream flavor**.
To achieve this depth of flavor, you have a couple of options:
*
Stovetop Method: This is the quickest and often preferred method for its control. Spread your unsweetened shredded or flaked coconut in a single layer in a dry, heavy-bottomed skillet over medium-low heat. The key here is constant vigilance. Coconut can go from perfectly golden to burnt in a matter of seconds. Stir frequently, almost continuously, until the flakes turn a beautiful, even golden brown and release a fragrant, nutty aroma. This usually takes 5-8 minutes.
*
Oven Method: For larger batches, the oven can be more convenient. Preheat your oven to 300°F (150°C). Spread the coconut evenly on a baking sheet. Bake for 10-15 minutes, stirring every 3-5 minutes, until golden brown. Keep a close eye on it, as oven temperatures can vary.
No matter which method you choose, immediately remove the toasted coconut from the heat source and transfer it to a plate or cool surface to stop the cooking process. Allowing it to cool completely before incorporating it into your ice cream base is essential. This crucial step is what truly sets apart exceptional **homemade toasted coconut ice cream** and helps
Unlock Rich Toasted Coconut Ice Cream Flavor This Summer.
Achieving Perfect Scoopability: No More Rock-Solid Ice Cream!
There's nothing more frustrating than eagerly anticipating a scoop of homemade ice cream, only to find your creation has frozen solid, resisting every attempt to extract a serving. Many home ice cream makers face this challenge, especially with dairy-free or low-sugar recipes. The good news is that achieving smooth, perfectly scoopable **toasted coconut ice cream** is entirely possible with a simple, brilliant trick: a touch of alcohol.
Here's the science: Ice cream's texture is largely determined by the size of the ice crystals that form during freezing. Smaller crystals mean a smoother, creamier mouthfeel. When an ice cream base freezes too hard, it's often because large ice crystals have formed, resulting in that rock-solid, unyielding texture. Alcohol, even in a small amount, acts as an anti-freeze. It lowers the freezing point of the mixture, preventing the formation of large ice crystals and promoting a softer, more pliable texture.
*
The Vodka Trick: The best solution, highly recommended by experienced home chefs, is to add just one tablespoon of a neutral spirit like vodka to your ice cream base before churning. Don't worry about the flavor; this small amount is imperceptible in the final product and won't make your ice cream taste boozy. It's truly a secret weapon for maintaining that light, fluffy, and perfectly scoopable consistency. This tip is particularly invaluable for vegan ice creams, which can be more prone to freezing solid due to a different fat and sugar composition.
*
Other Scoopability Factors: While the vodka is a game-changer, other factors contribute to creamy texture. Ensure your ice cream base is thoroughly chilled before churning, ideally for at least 4-6 hours or overnight. This helps the churning process start colder and more efficiently. Also, avoid over-churning, which can incorporate too much air and create a brittle texture. Finally, if your ice cream has been in the freezer for an extended period, allowing it to "temper" on the counter for 5-10 minutes before serving can significantly improve its scoopability.
Crafting Your Base: Sweeteners, Creaminess, and Customization
Beyond the toasted coconut, the base of your ice cream is where you control its fundamental character – its sweetness, richness, and potential for additional flavors. Building a superb base is crucial for any **homemade toasted coconut ice cream recipe**.
Sweeteners: Beyond Traditional Sugar
Sugar plays a vital role in ice cream, not just for sweetness but also for texture. It helps lower the freezing point, contributing to that desirable softness. While granulated sugar is standard, you have options:
*
Monkfruit Sweetener: For those looking to reduce sugar intake without sacrificing sweetness, monkfruit is an excellent, natural alternative. Derived from monk fruit, it's sugar-free, zero-calorie, and has a zero glycemic index. Many find it an ideal substitute, especially in recipes where sugar is a significant component. If you're concerned about sugar or following a specific diet, consider giving it a try. Brands like Lakanto are often recommended for their quality and natural taste. Just remember to adjust the quantity according to its sweetness equivalency to sugar, as it's often much more concentrated.
*
Other Natural Sweeteners: Maple syrup or agave nectar can also be used, though they will slightly alter the final flavor and color of your ice cream. Their liquid form also needs to be accounted for in the recipe's overall liquid content.
Achieving Unmatched Creaminess
The creaminess of your **toasted coconut ice cream** is paramount. For a rich, indulgent experience:
*
Dairy-Based: A combination of heavy cream and whole milk (or half-and-half) is typical for dairy ice creams, providing a luxurious mouthfeel.
*
Vegan-Based: For a delicious plant-based version, full-fat coconut milk and/or coconut cream are your best friends. These provide not only the fat content necessary for creaminess but also reinforce the natural coconut flavor. For those exploring a sugar-conscious, plant-based option, our guide on
Delicious Vegan Toasted Coconut Ice Cream: Sugar-Free & Scoopable offers fantastic insights into achieving this.
Endless Customization: Swirls and Mix-ins
While **toasted coconut ice cream** is fabulous on its own, it also serves as a perfect canvas for countless complementary flavors. These can be added during the last 5 minutes of churning or swirled in as you transfer the ice cream to its storage container.
*
Chocolate: A classic pairing. Swirl in melted dark chocolate or sprinkle in chocolate chips (mini chips work wonderfully).
*
Caramel: A drizzle of homemade or store-bought caramel sauce creates a decadent ribbon through the ice cream.
*
Tropical Fruits: Diced mango, pineapple, or fresh strawberries and blueberries can add a burst of fruity freshness. Just ensure fruits are finely diced to prevent them from freezing too hard.
*
Nuts & Seeds: Chopped pecans, macadamia nuts, or even toasted almonds can add another layer of crunch and nutty flavor.
*
Spices & Zests: A hint of cinnamon, a touch of lime zest, or bright orange zest can elevate the coconut flavor with a delightful aromatic complexity.
Don't be afraid to experiment! The beauty of homemade ice cream is the freedom to tailor it precisely to your taste.
Essential Equipment for Your Ice Cream Journey
You don't need a professional kitchen setup to make fantastic **homemade toasted coconut ice cream**. For most home cooks, a simple, basic ice cream maker is more than sufficient.
*
Freezer-Bowl Ice Cream Makers: These are the most common and affordable options, often retailing for less than $50. Models like the Cuisinart 1.5-quart maker are reliable workhorses. The key is to remember to freeze the bowl completely beforehand – usually for at least 12-24 hours, or until it's solid. Having a consistently frozen bowl ensures efficient churning and creamier results.
*
Compressor Ice Cream Makers: If you plan on making ice cream very frequently or in large batches, a compressor model might be a worthwhile investment. These don't require pre-freezing the bowl, as they have their own refrigeration unit. However, they are significantly more expensive.
*
Storage Containers: Invest in a good airtight freezer-safe container. This helps prevent freezer burn and keeps your **toasted coconut ice cream** fresh and delicious for longer. Shallow, rectangular containers often work best for even freezing.
With the right approach to toasting, a clever trick for scoopability, and the freedom to customize your base, you're all set to create an unforgettable dessert.
Conclusion
Crafting **homemade toasted coconut ice cream** is a culinary adventure that rewards your effort with an unparalleled depth of flavor and a wonderfully creamy texture. By meticulously toasting your coconut, employing the simple vodka trick for perfect scoopability, and thoughtfully building your base with preferred sweeteners and luscious cream, you transform a few humble ingredients into a gourmet delight. This isn't just an ice cream; it's a testament to the magic of homemade treats. So, embrace the process, experiment with your favorite mix-ins, and prepare to indulge in the ultimate tropical indulgence, perfectly tailored by you.